
Oh, there’s just something magical about looking at a perfectly frosted, impossibly beautiful cake and thinking, “Could I *actually* make that?” The secret, my friend, is that you absolutely can! Learning How to Make Cake Ideas Recipes Like a Pro (2025) isn’t about having a fancy bakery, it’s about understanding a few key techniques and having a spark of creative joy. I still remember the first time I tried to tackle a layered cake for my best friend’s birthday. My kitchen looked like a flour bomb went off, and honestly, the cakes weren’t exactly perfect—they were a bit wonky, if I’m being totally honest! But you know what? We had a blast, it tasted amazing, and it totally fueled my love for experimenting. This guide is all about giving you that same confidence, sharing inspiration, and breaking down those pro techniques so you can create show-stopping cakes right in your own kitchen!
Your Blueprint for How to Make Cake Ideas Recipes Like a Pro (2025)
So, ready to dive in and unlock those pro cake-making secrets for 2025? This section is your roadmap! We’re going to break down exactly how to whip up this gorgeous mocha chocolate cake, from the ingredients you’ll need to the final, dazzling drip. Get ready to feel totally confident in your kitchen as we walk through each step, making sure you get that show-stopping result you’ve been dreaming of. It’s all about building those skills layer by layer, just like building your cake!
Essential Ingredients for Professional Cake Success
Okay, let’s talk ingredients! These are the building blocks for a truly pro-level cake. Having everything measured out *before* you start mixing is key – trust me on this! For our delicious Chocolate Cake, you’ll need: 1 1/2 cups all-purpose flour, 1 1/2 cups granulated sugar, 3/4 cup sifted Dutch-processed cocoa powder, 1 1/2 tsp baking soda, 1 tsp baking powder, 1 tsp salt. Then for the wet stuff: 1/4 cup vegetable oil, 3/4 cup buttermilk, 3/4 cup hot strong brewed coffee, 2 large eggs, and 2 tsp vanilla extract. My Mocha Buttercream requires 3 large egg whites, 1 cup granulated sugar, 1 1/2 cups unsalted butter (room temp and cubed, this is important!), 1 tsp vanilla extract, 1 Tbsp instant espresso powder (dissolved in 1 tsp hot water and cooled), and 3 oz dark chocolate (chopped, melted, and cooled). Finally, for our Ganache Drip: 3 oz dark chocolate and 3 oz heavy whipping cream. Pro tip: using a kitchen scale for measuring your dry ingredients, especially flour and cocoa, will give you super consistent results every single time!
Mastering the Chocolate Cake Base
First things first, let’s get that oven preheated to 350°F (175°C). Grab your three 6-inch round cake pans, give them a good grease, and dust them with cocoa powder – this prevents that chalky white flour residue. Pop some parchment paper circles in the bottom too, it’s an extra layer of insurance! Now, in your stand mixer bowl, dump all your dry cake ingredients together: flour, sugar, cocoa, baking soda, baking powder, and salt. Give ‘em a quick stir. In a separate medium bowl, whisk together the buttermilk, vegetable oil, eggs, vanilla extract, and *very carefully* pour in the hot coffee. You want to add the coffee slowly so it doesn’t scramble those eggs! Pour all those wet ingredients into the dry. Mix it on medium speed for about 2-3 minutes. Don’t panic, this batter is supposed to be super thin – that’s what makes it so moist! For perfect layers, use your kitchen scale to make sure you divide the batter equally between the prepared pans. Bake for about 30-35 minutes, or until a cake tester comes out mostly clean. Let them cool in the pans for about 10 minutes before flipping them onto a wire rack to cool completely.
Crafting Perfect Mocha Buttercream
This is where things get really fancy: we’re making a Swiss meringue buttercream! It sounds intimidating, but it’s totally doable. Grab your stand mixer bowl and add the 3 egg whites and 1 cup of sugar. Give it a quick whisk to combine, just making sure there are no stray bits of yolk and that your bowl and whisk are super clean and grease-free. Now, set that bowl over a pot with about an inch or two of simmering water – we’re making a double boiler! Stir the mixture constantly with a whisk until it’s hot to the touch and you can’t feel any sugar grains anymore. If you have a candy thermometer, aim for 160°F (71°C). This usually takes about 3 minutes. Carefully take the bowl off the heat and place it on your stand mixer. Whisk it on medium-high speed until you have stiff, glossy peaks and the meringue is completely cool – you’ll know when the bowl feels cool to the touch. This might take 5-10 minutes, so be patient! Once it’s cool and stiff, switch to your paddle attachment if you have one. Now, *slowly*, piece by piece, add your room-temperature butter. Yep, it might look weird and curdled at first – like it’s totally broken! Just keep mixing, and it will magically smooth out into gorgeous, silky buttercream. Add in that vanilla extract, the cooled melted dark chocolate, and the dissolved espresso mixture. Whip it all up until it’s perfectly smooth and tastes like heaven. If it ever looks weird, remember your friend Katherine has seen it all, and keep mixing!
Creating a Stunning Ganache Drip
For that beautiful drip effect, we need a good ganache. It’s ridiculously simple! Finely chop your 3 oz of dark chocolate and pop it into a heatproof bowl. Gently heat your 3 oz of heavy whipping cream in a small pot until it *just* starts to simmer around the edges – don’t let it boil! Pour that hot cream right over the chopped chocolate. Cover the bowl tightly with plastic wrap and let it sit for about 2 minutes. This lets the chocolate melt gently. Then, grab a spatula and stir *gently* from the center outwards until it’s all smooth and glossy. You want it to cool down and thicken up a bit before you use it on your cake, so it drips just the way you want it. You can even check out this awesome mocha cake for more ideas on ganache!
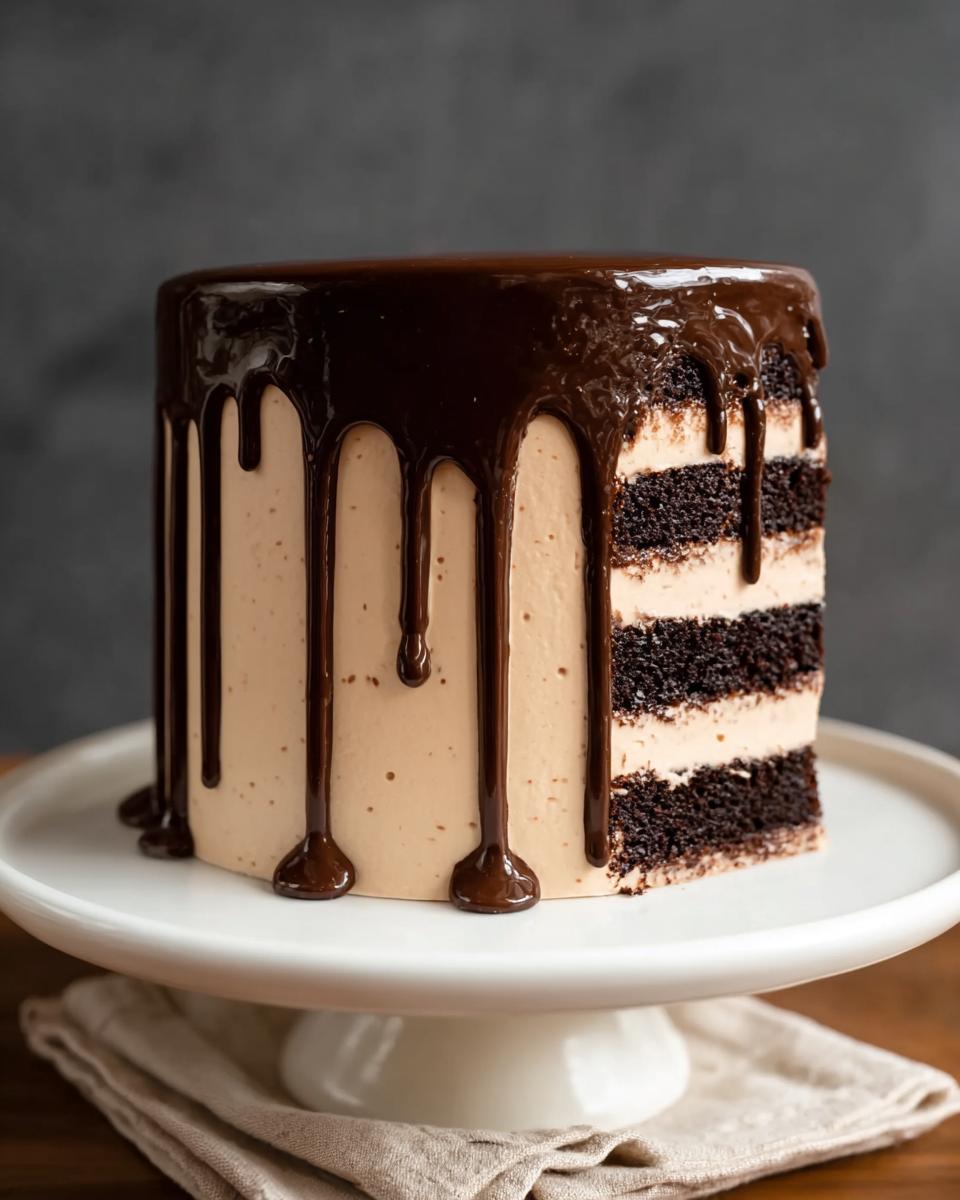
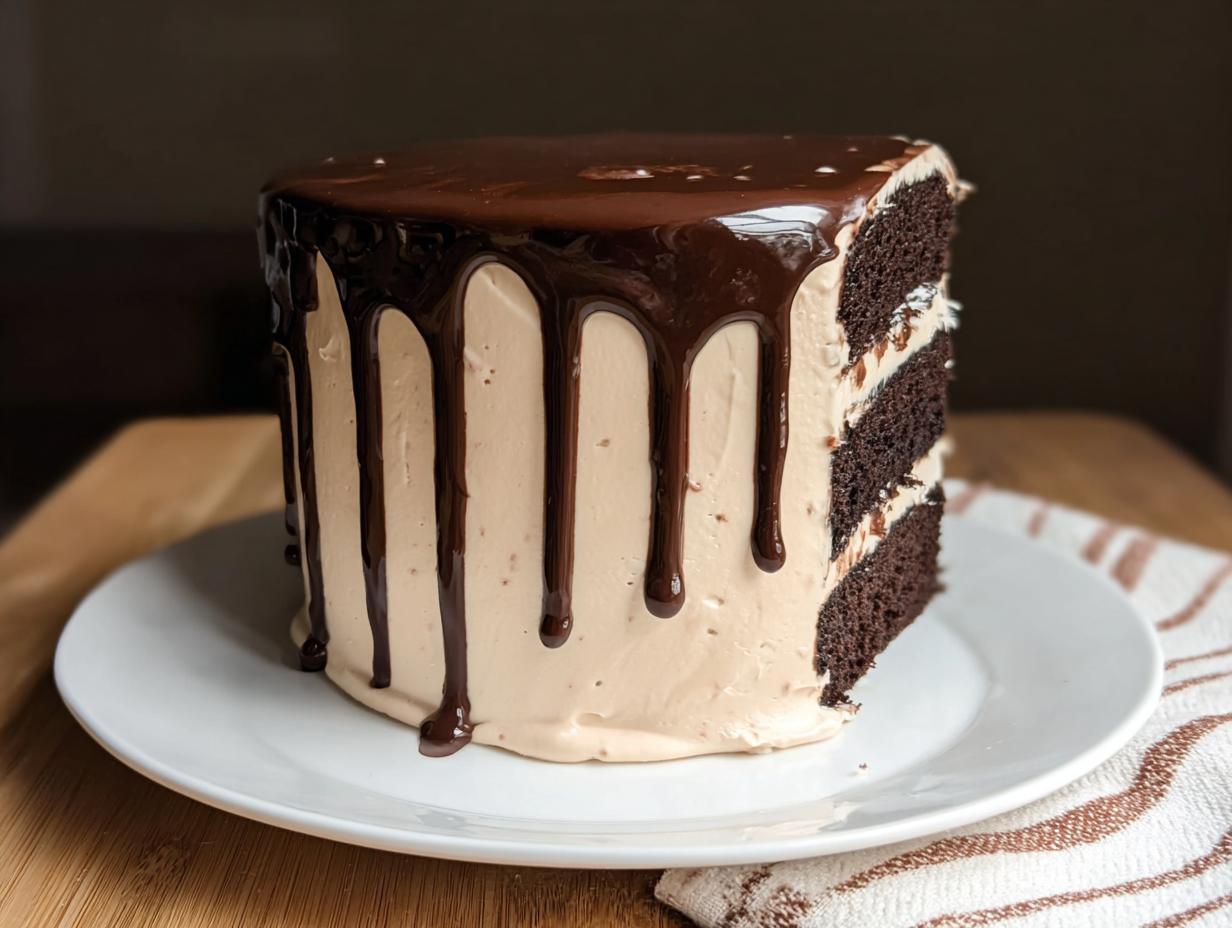
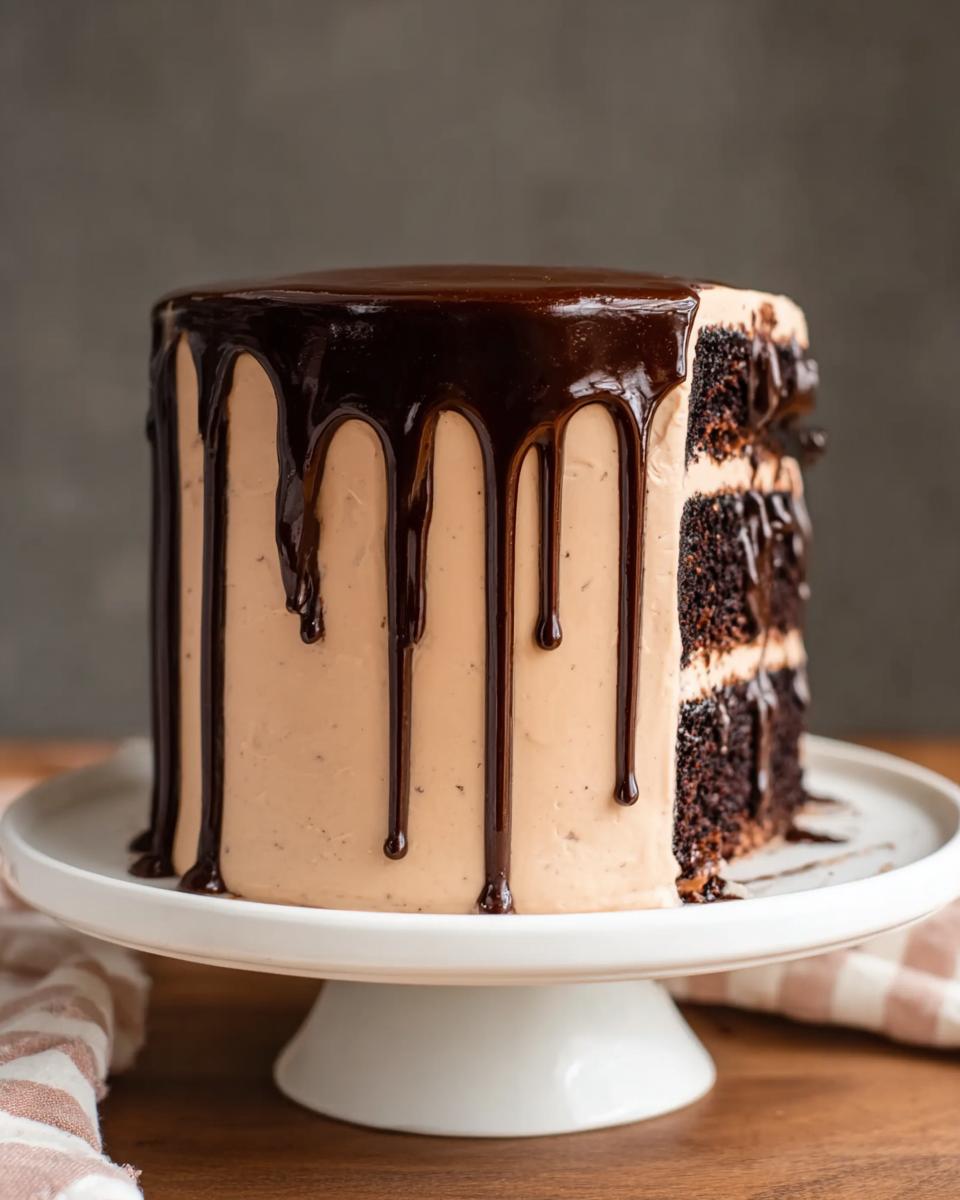
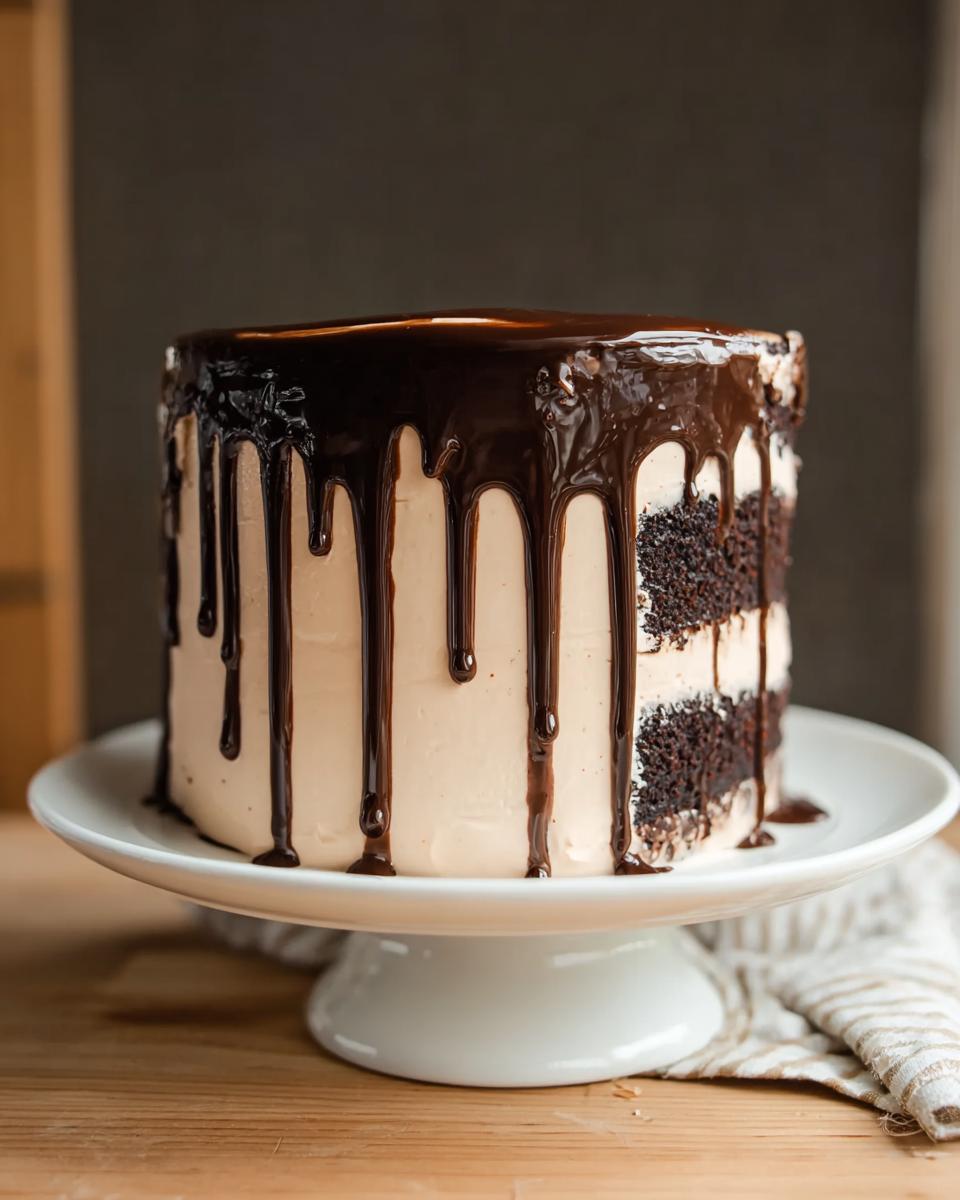
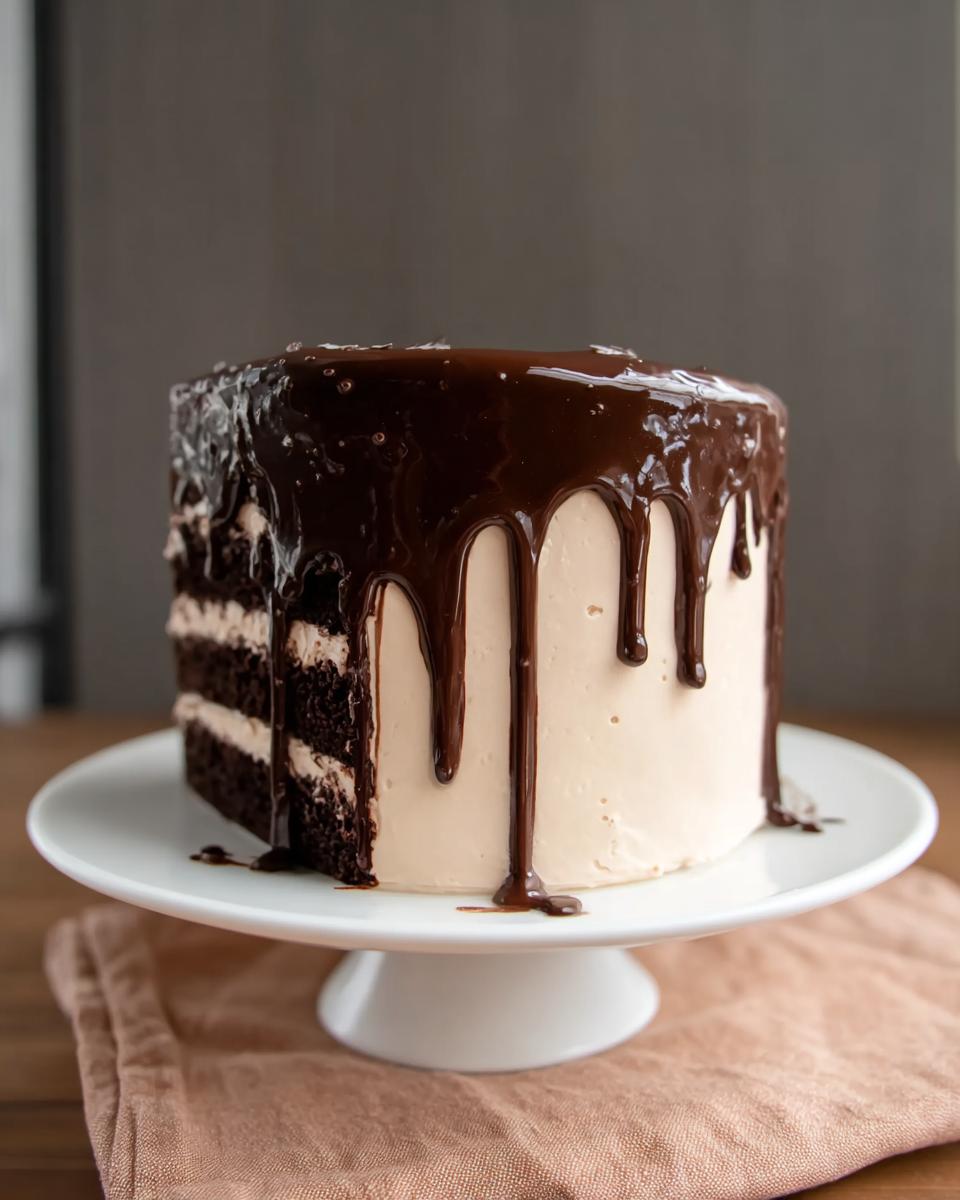
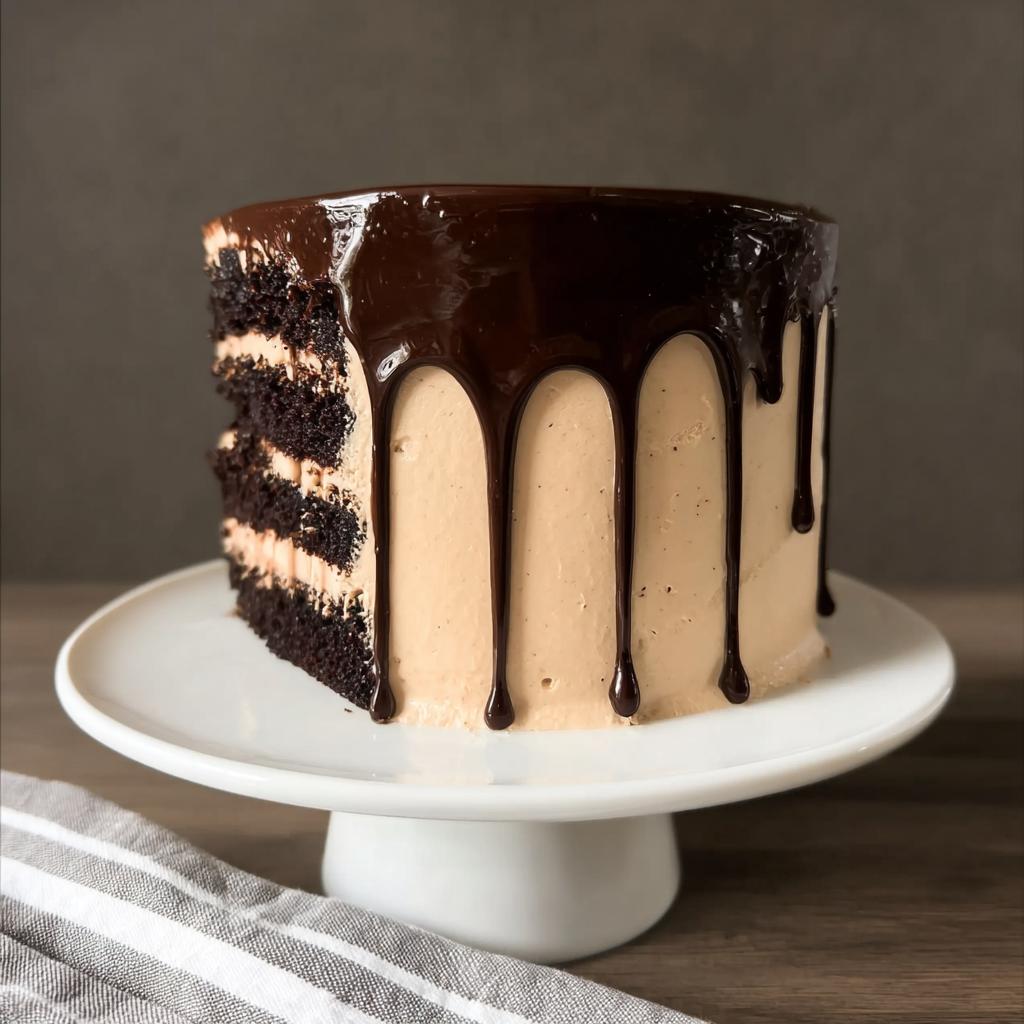
Assembly: Bringing Your Cake Ideas to Life
Time to put it all together! Plop one of your beautiful, cooled cake layers onto your serving plate or cake stand. Spread about 2/3 cup of that dreamy mocha buttercream evenly over the top. Then, add your next cake layer, another scoop of frosting, and repeat! Finish with the final cake layer. Now, give your whole cake a thin, crumb coat of frosting all around. This is like a sticky base to catch all those loose crumbs. Pop the cake into the fridge for about 20 minutes to let that thin coat firm up. Once it’s chilled, apply a more generous, final layer of frosting, smoothing the sides as best you can with an offset spatula. Back into the fridge it goes for another 20 minutes – chilling is your best friend here! Once it’s nice and firm, use a small spoon to drizzle dollops of your slightly cooled ganache around the top edge of the cake, letting gravity do its thing and create those perfect drips. Then, fill in the rest of the top surface with the remaining ganache, spreading it smoothly with your offset spatula. Voila! A pro-level cake!
Expert Tips for How to Make Cake Ideas Recipes Like a Pro (2025)
Okay, so you’ve got the recipe, you’ve followed the steps – awesome! But to really take your cakes from “homemade” to “wowzas, that’s pro!” there are a few little secrets I’ve picked up over the years. It’s all about paying attention to the details, you know? Like really understanding *why* we do certain things. Check out my favorite recipes for more inspiration!
Ingredient Spotlight: The Magic of Dutch-Processed Cocoa
You might have noticed I’m pretty specific about Dutch-processed cocoa. This stuff is treated differently than natural cocoa powder, which gives it a smoother, less acidic flavor and a gorgeous, deep dark color. It really makes the chocolate flavor pop in our cake, giving it that rich, decadent taste that screams “professional!” Plus, it reacts nicely with the baking soda and powder we used, helping everything rise just right.
Troubleshooting Common Cake Challenges
Ever had a cake sink in the middle? Or maybe it came out a little dry? Don’t you worry! If your cake sinks, it often means the oven was too hot or it was taken out too soon. Try to cool it completely before frosting, and sometimes a little extra frosting can hide those imperfections! If it’s dry, maybe you overbaked it a smidge, or perhaps didn’t add enough liquid. Make sure your oven temp is spot on – those cheap oven thermometers are lifesavers! For lopsided layers, a serrated knife and a steady hand is your best bet for leveling them out before you stack. It all comes with practice, but these little tips can save a cake!
Frequently Asked Questions About Cake Making
Got questions swirling around in that baker’s brain? Totally understandable! Here are a few things folks often wonder about, and I’m happy to shed some light. If you’ve got more, don’t hesitate to reach out through my contact page!
Can I use a different type of flour for this cake?
You know, for this particular recipe, I really recommend sticking with all-purpose flour. It’s got just the right balance of protein for that lovely tender crumb without being too dense. Other flours, like cake flour, might make it a bit too delicate, and some gluten-free blends can change the texture quite a bit. You *could* experiment with a good 1:1 gluten-free option, but I can’t guarantee the exact same amazing results!
How do I store leftover cake?
Storing your masterpiece is super important! Once it’s fully cooled, wrap the cake layers tightly in plastic wrap, or store the assembled cake in an airtight container at room temperature for up to 2 days. If it’s really warm where you are, or for longer storage, pop it in the fridge. Just let it come to room temp for about 30 minutes before serving for the best flavor and texture. And remember that ganache note – it’s pretty forgiving!
What are some variations on this cake?
Oh, the fun possibilities! You could swap the vanilla extract for almond or even a touch of peppermint for a wintery twist. Feel free to stir in some chopped toasted walnuts or pecans into the batter for a little crunch. And honestly, while the mocha buttercream is divine, a classic chocolate buttercream or even a simple vanilla bean frosting would be lovely too. Get creative!
Estimated Nutritional Information
Just a heads-up, this is an estimate, okay? Baking can vary, and so do those precise numbers. Based on the ingredients and serving size listed, each slice of this decadent cake is roughly: 613 calories, 64g carbohydrates, 6g protein, and 38g fat. It also contains about 24g of saturated fat, 103mg cholesterol, 406mg sodium, 324mg potassium, 3g fiber, and 46g sugar. You can find more details on how diets work on my terms of service page!
Share Your Creations!
Okay, now it’s YOUR turn! Seriously, I can’t wait to see what amazing cakes you whip up. Did you try this mocha chocolate beauty? What did you think? Drop a comment below with your thoughts, give the recipe a star rating if you loved it, and please, please, PLEASE share photos of your creations with me on social media! Tag me so I can geek out over your beautiful bakes. I love seeing how you bring these cake ideas to life! Head over to my recipes section to find even more inspiration!
How to Make Cake Ideas Recipes Like a Pro (2025)
Ingredients
Equipment
Method
- Preheat oven to 350F. Grease three 6″ round baking pans and dust with cocoa powder. Line bottoms with parchment paper.
- Place all dry ingredients into the bowl of a stand mixer fitted with a paddle attachment. Stir to combine.
- In a medium bowl, whisk all wet ingredients. Pour coffee in slowly to avoid cooking the eggs if very hot.
- Add wet ingredients to dry and mix on medium for 2-3 minutes. The batter will be very thin.
- Pour batter evenly into prepared pans. Use a kitchen scale to ensure even distribution.
- Bake until a cake tester comes out mostly clean, about 30-35 minutes.
- For the Mocha Buttercream: Place egg whites and sugar into the bowl of a stand mixer, whisk until combined. Ensure there are no traces of egg yolks and the bowl and whisk are grease-free.
- Place the bowl over a pot with 1-2 inches of simmering water. Stir constantly with a whisk until the mixture is hot and no longer grainy to the touch, or reads 160F on a candy thermometer (about 3 minutes).
- Place the bowl on your stand mixer and whisk on medium-high until the meringue is stiff and cooled (the bowl is no longer warm to the touch, approximately 5-10 minutes).
- Switch to the paddle attachment (optional). Slowly add cubed butter and mix until smooth. The buttercream may look like it is curdling at some point; keep mixing until it is completely smooth.
- Add vanilla extract, melted dark chocolate, and espresso powder mixture. Whip until smooth.
- For the Ganache Drip: Finely chop dark chocolate and place into a bowl. Bring heavy whipping cream just barely to a simmer and pour over the chopped chocolate. Cover with plastic wrap and let stand for 2 minutes.
- Stir gently with a spatula until combined and smooth. Allow to cool and thicken slightly before using on the cake.
- Assembly: Place one layer of cake on a cake stand or serving plate. Top with approximately 2/3 cup of frosting and spread evenly. Repeat with remaining layers.
- Apply a thin coat of frosting all over the cake. Chill for 20 minutes.
- Frost and smooth the sides of the cake. Chill for another 20 minutes.
- Using a small spoon, place dollops of ganache around the top edges of the cooled cake, allowing some to drip down. Fill in the top of the cake with more ganache and spread evenly with an offset spatula.
Nutrition
Notes
Tried this recipe?
Let us know how it was!
Seasonal Keto Forager
My kitchen windowsill tells my story: mason jars filled with foraged wild mushrooms, elderflower cordial, and pickled ramps. Those childhood summers with my grandmother in Vermont, learning to identify edible plants, became my career when I realized most wild foods are already perfectly keto.
After my Environmental Science Master’s, I chose an unconventional path: rediscovering forgotten wild foods that naturally align with low-carb living. Why eat sad cauliflower when the forest is full of incredible flavors waiting to be sustainably harvested?
My seasonal collections follow nature’s rhythm—spring nettles, summer berries, autumn acorns, winter roots. My maple syrup alternative made from birch sap got national attention. I lead foraging workshops through the Appalachian Mountain Club, teaching sustainable wild food identification.
The earth provides everything we need if we remember how to listen—keto just helps us appreciate that nature got it right the first time.