
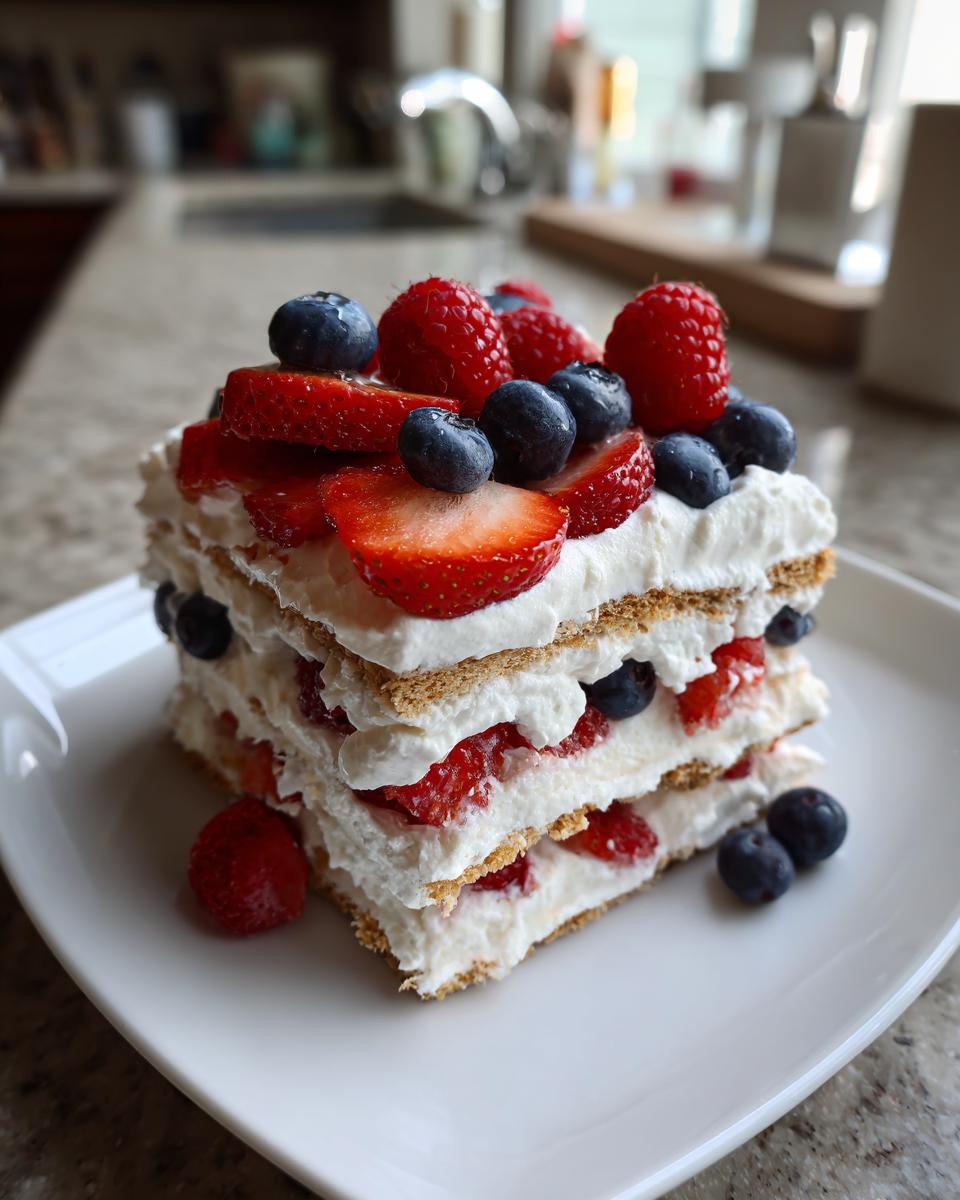
Oh, the Fourth of July! It’s practically synonymous with backyard barbecues, fireworks, and, of course, delicious desserts. But honestly, who wants to be slaving over a hot oven when it’s blazing outside? That’s where this show-stopping Red White and Blue Icebox Cake comes in. I remember making this for the first time years ago for a neighborhood cookout, and let me tell you, it was a HUGE hit! It looks absolutely stunning on the dessert table, all those vibrant colors, and the best part? You don’t even need to turn on the oven. It’s seriously one of my go-to Fourth of July desserts because it’s just so darn easy and always impresses everyone.
Why You’ll Love This Fourth of July Desserts With Red White Blue Icebox Cake
Honestly, what’s not to love about this cake? It’s a total winner for so many reasons:
- Super Easy to Make: Seriously, no baking required! Just layer and chill.
- Perfect for Summer: It’s cool, creamy, and refreshing – the ultimate antidote to a hot day.
- Total Crowd-Pleaser: Everyone, from kids to grandparents, goes nuts for this.
- Festive & Gorgeous: Those red, white, and blue layers look absolutely stunning and are perfect for any patriotic celebration.
Ingredients for Your Red White Blue Icebox Cake
Alright, let’s get baking – well, *assembling*! The beauty of this icebox cake is how simple the ingredients are. You probably have most of them in your pantry right now! Trust me, using good quality, fresh ingredients makes all the difference here. I always try to snag the ripest berries I can find!
For the Cake Layers
We’re keeping it classic and simple here. The graham crackers are key because they soften up beautifully in the cream, giving the cake that perfect melt-in-your-mouth texture.
- 2 packages Graham crackers (about 14-16 crackers per package – you might need to break a few to fit pefectly!)
For the Luscious Cream Filling
This is where the magic happens! Whipping up this cream is super easy with an electric mixer, and it creates such a light, dreamy layer. Make sure your heavy cream is nice and cold for the best results!
- 2 cups Heavy cream (must be cold!)
- 1 cup Powdered sugar (for sweetness, of course!)
- 1 teaspoon Vanilla extract (pure vanilla, if you have it, adds the best flavor!)
For the Vibrant Topping
And now, for the showstopper! Using fresh fruit is non-negotiable for me here. The bright colors and fresh flavors are what give this cake its iconic look and taste.
- 1 cup Fresh strawberries, all washed and sliced up
- 1 cup Fresh blueberries, rinsed and ready to go
- 1 cup Fresh raspberries, gently rinsed (these are a bit more delicate, so handle with care!)
If you’re ever looking for some fun no-bake dessert inspiration, this recipe is a fantastic starting point!
Essential Equipment for Making Fourth of July Desserts
You don’t need a fancy kitchen for this one! Just a few basic tools will get you there. I always make sure I have these handy:
- 9×13 inch baking dish: This is the perfect size for layering everything up.
- Electric mixer: A lifesaver for whipping that cream into fluffy perfection!
- Spatula: For spreading all those lovely layers evenly.
Step-by-Step Guide to Your Red White Blue Icebox Cake
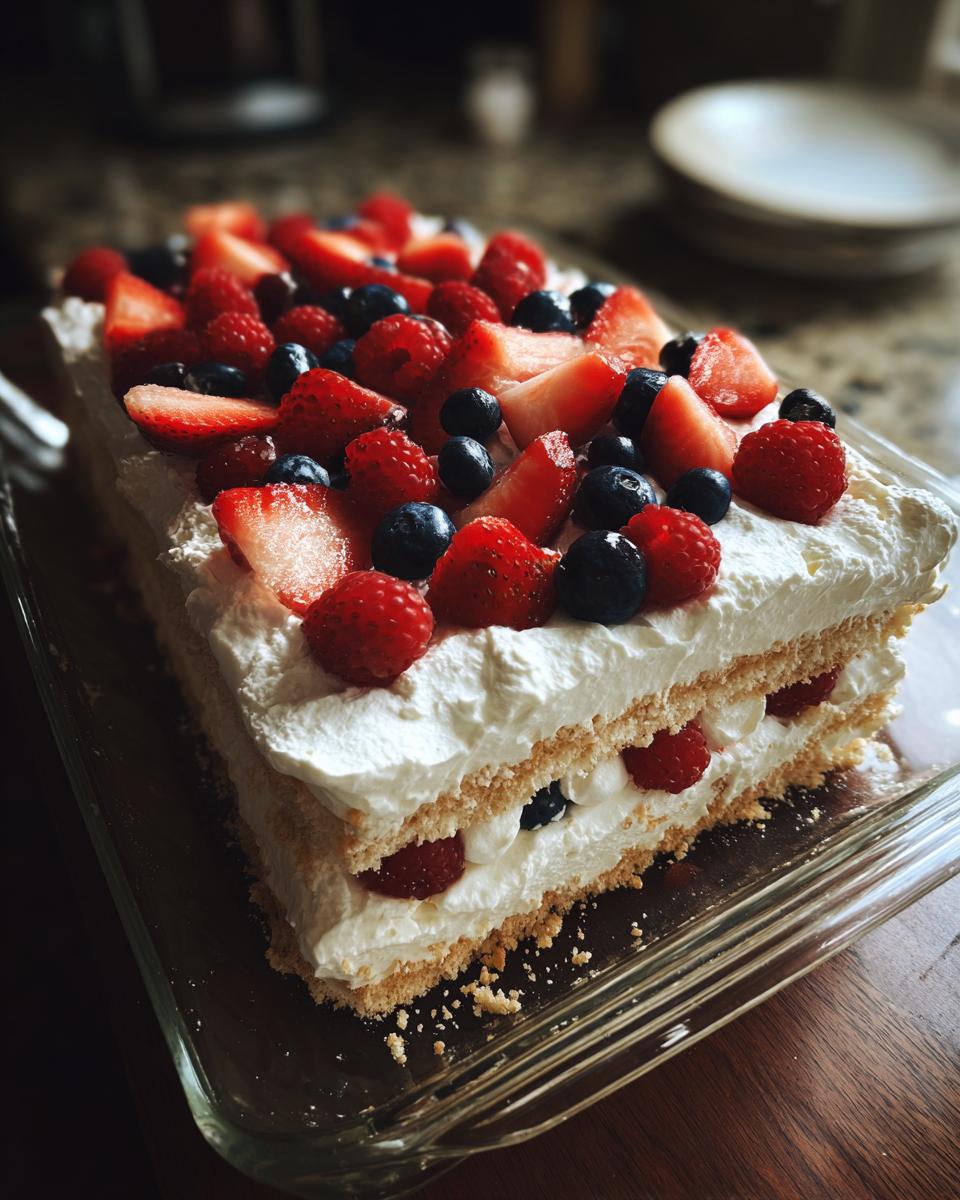
Alright, let’s get this party started! Making this icebox cake is honestly more like building a delicious dessert masterpiece than actual “cooking.” It’s super satisfying to see it all come together, layer by layer. Make sure you’ve got your 9×13 inch dish ready to go!
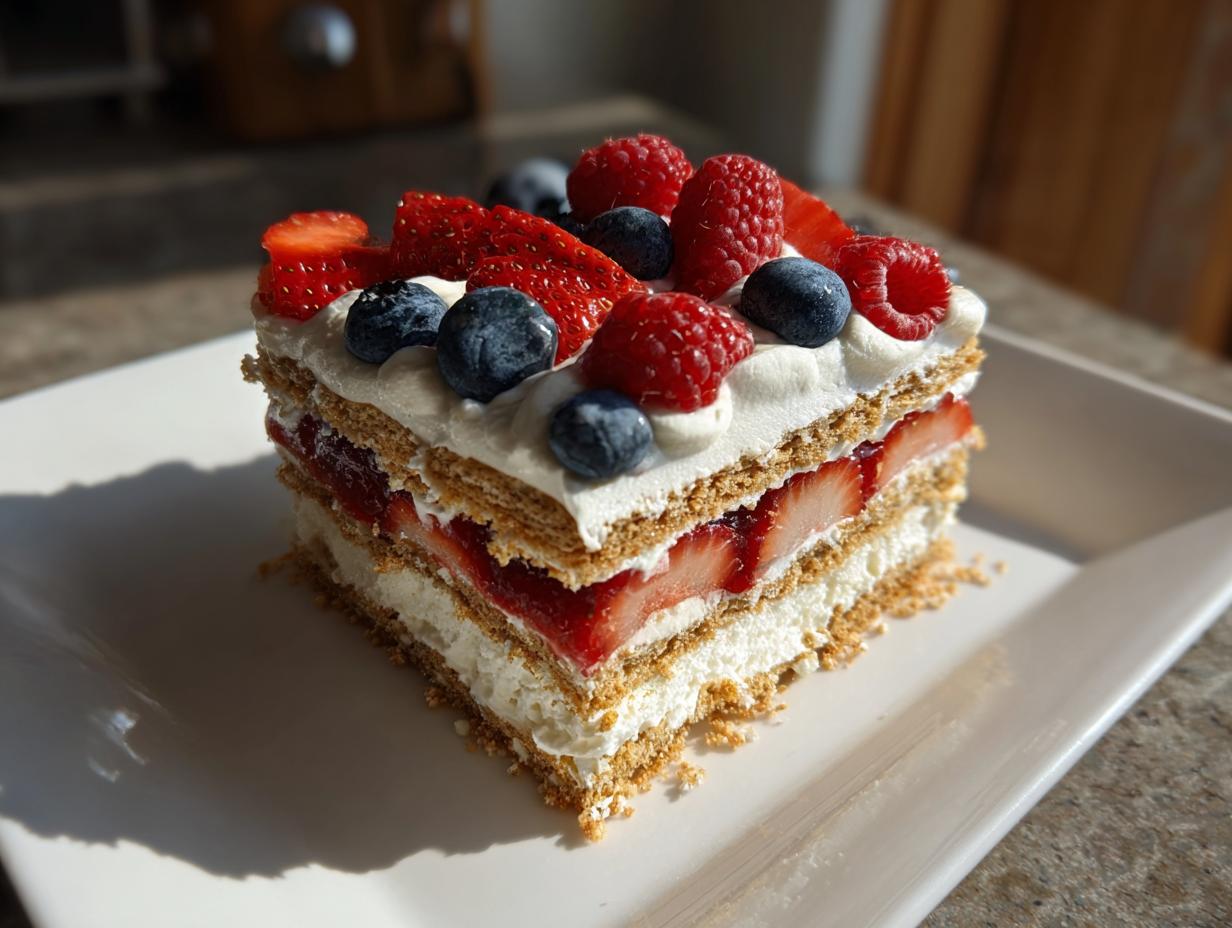
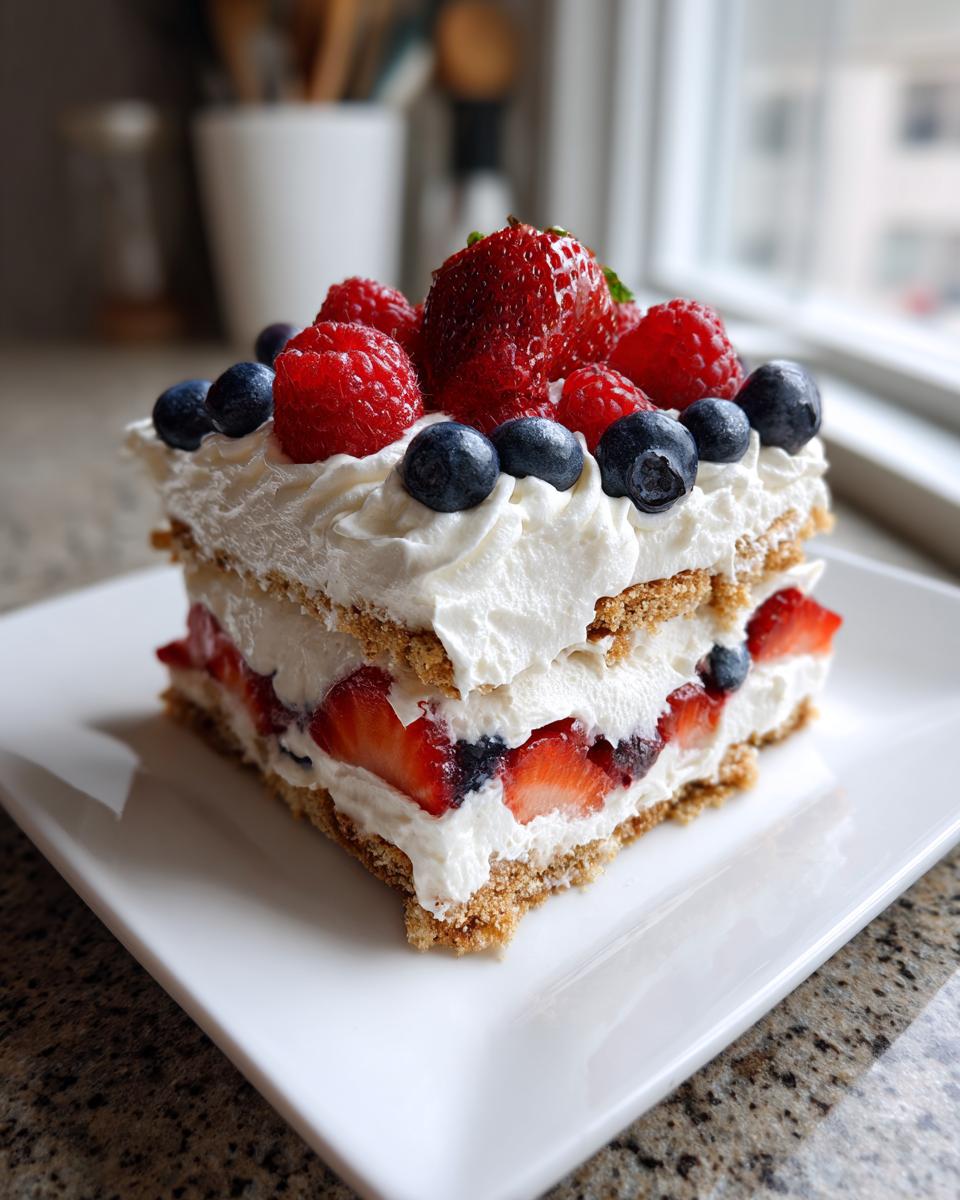
First things first, grab those graham crackers. You’ll want to line the entire bottom of your baking dish with a single layer. Don’t stress if there are little gaps or if you need to break a cracker to fill a space – that’s totally normal! We’re aiming for a nice, even base.
Now for the fluffy goodness: it’s time to whip up that cream. In a nice big bowl (make sure it’s clean, and if you can chill it beforehand, even better!), pour in your cold heavy cream. Get your electric mixer going on medium-high speed. You’re looking for soft peaks to form – that’s when the cream holds a little shape but the tip flops over. Be patient, it’s worth it!
Once you’ve got those soft peaks, it’s time to sweeten things up! Gradually add in your powdered sugar and that splash of vanilla extract. Keep mixing until the cream forms stiff peaks. This means when you lift the beaters, the cream stands straight up – no flopping allowed! This is the secret to a stable, dreamy filling. It should look so light and airy!
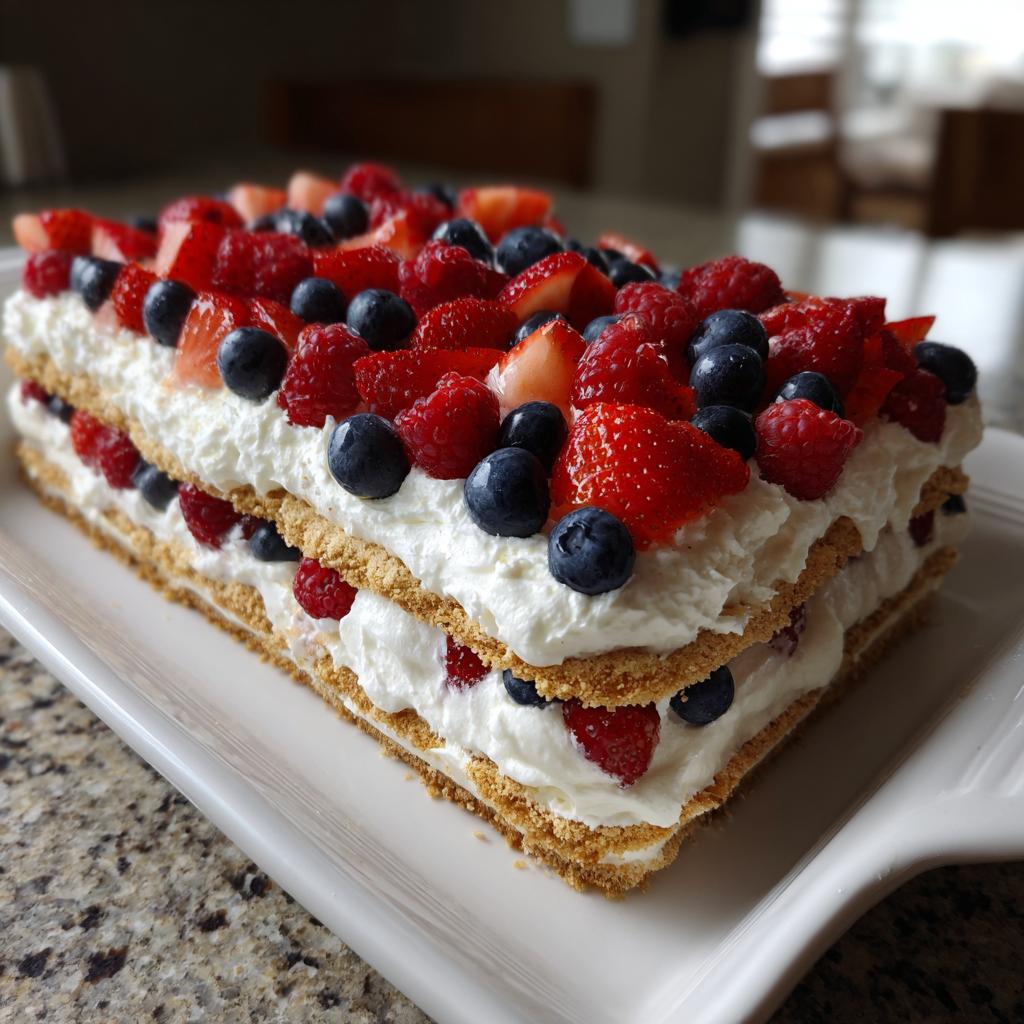
Time for our first layer of deliciousness! Take about half of that glorious whipped cream and spread it evenly over the graham cracker base. Use your spatula to get it nice and smooth. Don’t worry if it’s not absolutely perfect; some rustic charm is good!
Next up, the fruit! Arrange about half of your sliced strawberries and half of your blueberries right over that creamy layer. Try to spread them out so you get a little bit of fruit in pretty much every bite. This is where the colors start to really pop!
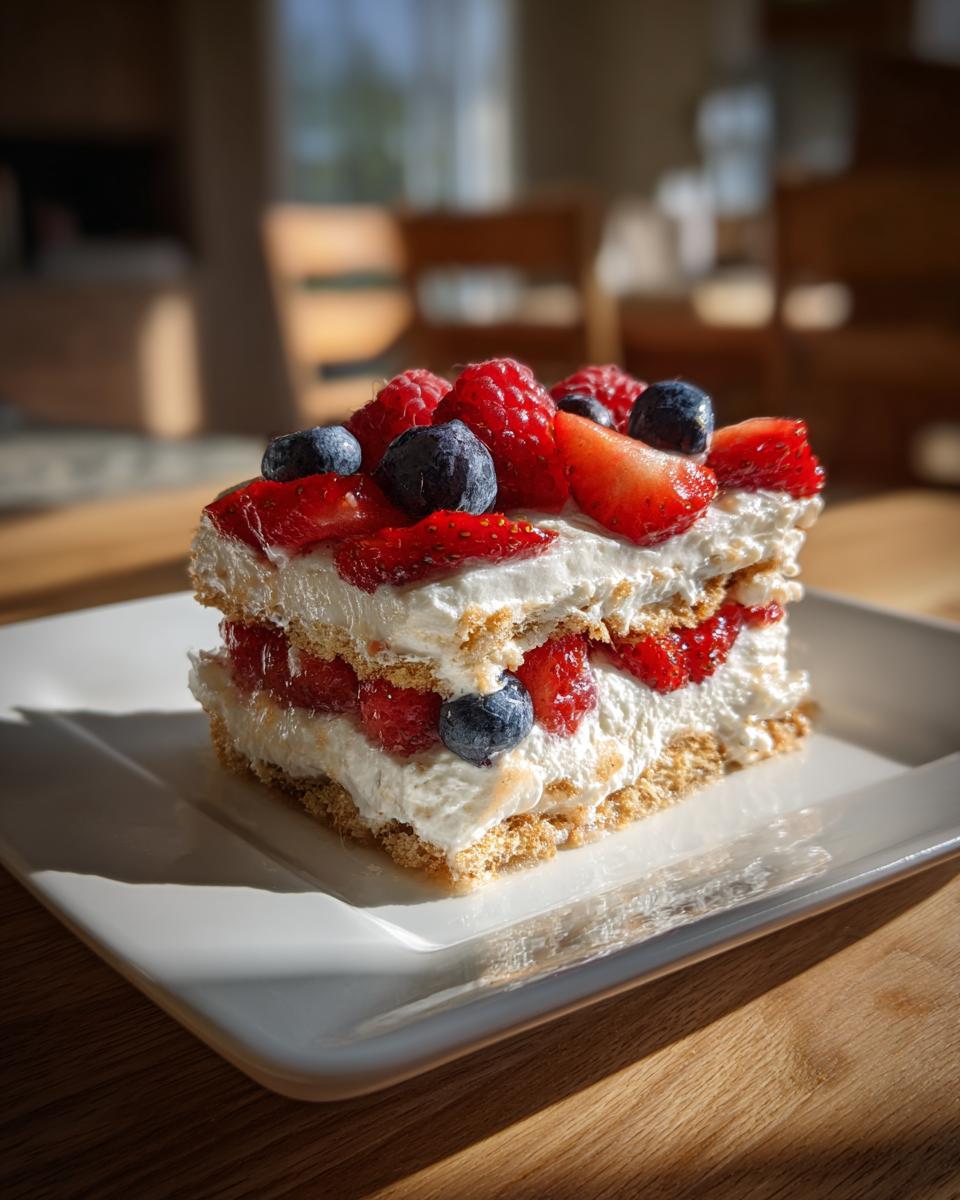
Now, we repeat! Add another layer of graham crackers right on top of the fruit. Again, break them as needed to cover the surface. It’s like building a delicious cookie sandwich!
And then, spread the rest of that luscious whipped cream mixture over this second cracker layer. Get it all smoothed out. Think of it as the canvas for our fruity masterpiece.
For the grand finale of topping, arrange the remaining strawberries, blueberries, and *all* of your raspberries. Those raspberries add such a gorgeous pop of color and a slightly different texture! This vibrant topping is what makes it so perfect for Fourth of July celebrations, kind of like how the layers in a Biscoff Tiramisu create visual appeal.
Here comes the most crucial part for that perfect icebox cake texture: chilling! Cover your dish really well with plastic wrap. You want to make sure it’s sealed tight. Pop it into the refrigerator for at least 4 hours. Honestly, I always leave mine overnight. This gives the graham crackers enough time to soften up beautifully and the flavors to really meld together. It’s like magic happening in the fridge! If you’re in a pinch, a quicker chill works, but overnight is truly best for that melt-in-your-mouth magic, similar to how desserts like chocolate lasagna get their amazing texture from chilling.
Once it’s done chilling and the crackers are perfectly soft, just slice it up and serve it cold. Enjoy every single bite of your stunning, no-bake creation!
Tips for the Perfect Fourth of July Desserts With Red White Blue Icebox Cake
Making this Red White and Blue Icebox Cake is pretty foolproof, but I’ve picked up a few little tricks over the years that really make it shine. Trust me on these!
Get Your Cream Just Right: The key to that dreamy, stable whipped cream? Make sure your heavy cream, bowl, and beaters are super cold! If your cream isn’t whipping up to stiff peaks, don’t be tempted to overmix. Just pop it back in the fridge for 15-20 minutes and try again. Honestly, it’s a game-changer.
Don’t Skimp on Chilling Time: I know, I know, you’re excited to eat it! But letting this cake chill properly (overnight is best!) is crucial. It allows those graham crackers to soften into a cake-like texture. If you rush it, you’ll end up with crunchy crackers, and that’s not quite the icebox cake vibe we’re going for. Think of it like letting flavors meld, just like in my blueberry swirl yogurt bites.
Fruit Freshness is Key: While frozen fruit *can* work in a pinch, fresh berries give you the best color and flavor. Plus, they won’t release too much extra water into the cake as they thaw. Just a gentle rinse and pat dry is all they need.
Ingredient Notes and Substitutions for Your Icebox Cake
Sometimes you don’t have exactly what the recipe calls for, and that’s totally okay! This icebox cake is super forgiving. If you can’t find graham crackers, no worries. Vanilla wafers or even shortbread cookies would give it a lovely flavor, though they’ll have a slightly different texture. You could even try no-bake Oreo cheesecake bites vibes with crushed Oreos for a chocolatey twist!
Swapping Out Graham Crackers
Graham crackers are the traditional choice because they soften up so nicely. But if you want to mix it up, vanilla wafers are a fantastic substitute. They add a subtle sweetness and soak up that cream just as well. For something a bit richer, buttery shortbread cookies are also a great option. Just make sure whatever cookie you choose is sturdy enough to hold its shape before it softens!
Dairy-Free or Vegan Options
Want to make this dairy-free or vegan? You can totally do it! Use a good quality vegan whipped cream or coconut cream (chill the can overnight and just scoop out the solid part). For the crackers, look for vegan graham crackers or even some of the cookie options mentioned above. Just double-check the labels to make sure they fit your dietary needs!
Storage and Reheating Instructions
Since this is a no-bake wonder, reheating isn’t really an option, but storing leftovers is super simple! Just make sure it’s tightly covered with plastic wrap to keep it fresh in the fridge. It’s usually best within about 2 to 3 days. Honestly though, it rarely lasts that long in my house!
Frequently Asked Questions About Red White Blue Icebox Cake
Can I make this Red White and Blue Icebox Cake ahead of time?Yes, absolutely! In fact, it’s even better if you do. The chilling time is crucial for the crackers to soften and the flavors to meld together. I usually make mine the night before, and it’s always perfect. It’s a lifesaver for busy holiday weekends!
What kind of crackers work best in this icebox cake?Graham crackers are my go-to because they have that perfect balance of sweetness and texture that softens up beautifully. But if you’re looking for a change-up, vanilla wafers are fantastic too, or even shortbread if you want something a little richer. Some folks even love using chocolate graham crackers for a fun twist!
Can I use frozen fruit instead of fresh?You definitely can use frozen fruit if fresh isn’t available, but there are a couple of things to keep in mind. Thaw the fruit completely and drain off any excess liquid before layering it. Frozen fruit can release more water as it thaws, which might make the cake a bit too soggy. Fresh berries usually give you the best texture and vibrant colors, but frozen is workable in a pinch! For a different kind of creamy delight, check out how 3-ingredient cookies and cream mousse turns out!
My whipped cream isn’t getting stiff, what am I doing wrong?Oh, that can be so frustrating! The most common reason is that the cream wasn’t cold enough to start with. Make sure your heavy cream, bowl, and even the beaters are nice and chilled. If it’s still not cooperating, try chilling the whole mixture for about 20 minutes in the fridge and then beat again. Also, make sure you’re not adding too much liquid too quickly when you add the sugar and vanilla!
Estimated Nutritional Information
Now, I’m not a registered dietitian or anything, but I like to give you a general idea of what you’re getting with each slice. This Red White and Blue Icebox Cake is usually around 300-350 calories per serving, with roughly 15-20g of fat, about 5-7g of protein, and around 35-40g of carbohydrates. Keep in mind this can totally change based on the exact brands you use and how big you slice it! For more healthy options, you might want to peek at my high-protein chocolate pudding recipe.
Red White and Blue Icebox Cake
Ingredients
Equipment
Method
- Line the bottom of a 9×13 inch baking dish with a single layer of graham crackers. You may need to break some crackers to fit.
- In a large bowl, beat the cold heavy cream with an electric mixer on medium-high speed until soft peaks form.
- Gradually add the powdered sugar and vanilla extract to the whipped cream. Continue beating until stiff peaks form.
- Spread half of the whipped cream mixture evenly over the graham crackers.
- Arrange half of the sliced strawberries and half of the blueberries over the whipped cream.
- Add another layer of graham crackers over the fruit.
- Spread the remaining whipped cream mixture over the second layer of graham crackers.
- Arrange the remaining strawberries, blueberries, and all of the raspberries over the top layer of whipped cream.
- Cover the dish tightly with plastic wrap and refrigerate for at least 4 hours, or preferably overnight, to allow the crackers to soften and the flavors to meld.
- Slice and serve chilled.